20 Raised Garden Bed Ideas for a Beautiful, Productive Vegetable Garden
The best raised garden bed ideas do two jobs at once: they look good in your yard and make growing food easier. A bed that fits your space, budget, and back saves you effort for years. A poor fit just becomes another project to fix.
This guide covers 20 raised garden bed ideas, sorted by material, layout, small-space comfort, and crop protection. Every idea includes who it suits, sensible sizes, and honest trade-offs so that you can choose with confidence.
You will find budget builds, modern kits, and designs for slopes, patios, and cold climates. Browse for the idea that matches your yard, then use the quick chooser near the end to confirm your pick.
Raised Garden Bed Ideas by Material
Material sets the look, the cost, and how long a bed lasts. These six ideas range from classic cedar to budget-friendly reclaimed wood.
1. Cedar Plank Beds With Sturdy Corner Posts

Build snapshot: Best for a classic, long-lasting look. Typical size: 4 ft wide, 8 to 12 in. tall. Cost: mid to premium. Skill: beginner.
Cedar is a favorite because the wood resists rot naturally, so you can skip chemical treatments. It weathers to a soft silver-gray that suits cottage, farmhouse, and modern yards. Expect it to outlast untreated pine, though not forever.
For a sturdy build, screw 2×6 or 2×8 boards to 4×4 corner posts with exterior-grade screws. Add a center brace on beds longer than about 8 ft so the sides do not bow. Keep the width at 4 ft or less so you can reach the middle from both sides.
Leaving the wood bare is the simplest option for edible gardens. If you want a finish, choose a product labeled safe for food gardens and keep it off the soil side. Silver cedar looks lovely with gravel paths and leafy green herbs.
2. Galvanized Steel and Stock-Tank Beds for a Modern Look

Build snapshot: Best for modern yards and patios. Typical size: 2 to 4 ft wide; tanks are round or oval. Cost: mid. Skill: beginner.
Galvanized steel beds go together quickly and bring a clean, modern look. Stock tanks, the large livestock troughs sold at farm stores, add a round or oval shape that softens a boxy yard. Taller versions are easier on the back.
Drill drainage holes in a stock tank before filling it, since most are made to hold water. Metal can get warm in strong sun, so mulch the soil and expect to water more often in hot summers. Check that the top edges are rolled or capped.
Some gardeners wonder about galvanized metal near edibles. An extension expert has noted that there is no definitive research on galvanized steel for vegetable growing, so it is worth reading your local extension guidance. A bright backdrop, like a painted fence, makes the metal pop.
3. Corrugated Metal Beds in a Timber Frame
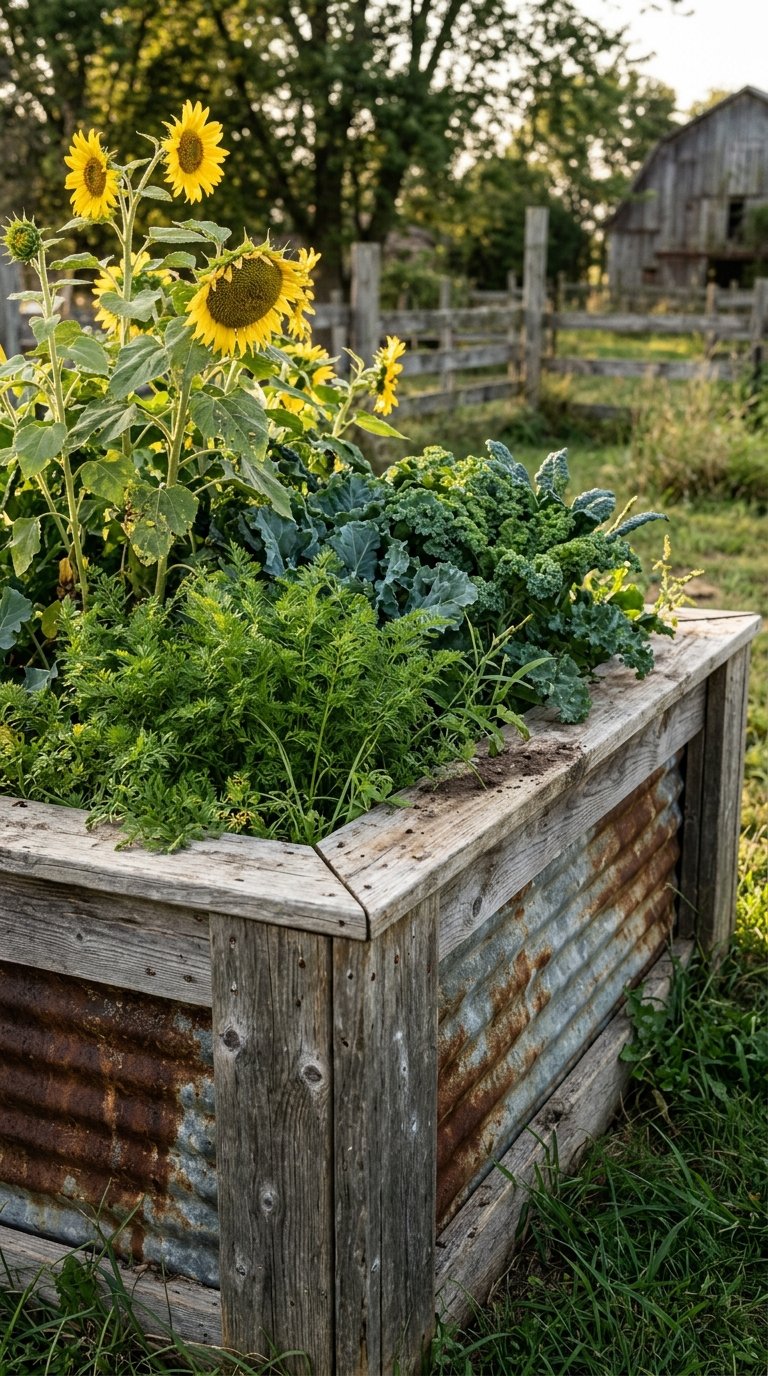
Build snapshot: Best for a farmhouse look on a budget. Typical size: 3 to 4 ft wide, 18 to 24 in. tall. Cost: budget to mid. Skill: intermediate.
Corrugated panels set inside a wooden frame give an easy farmhouse look at a modest price. The ribbed texture catches the light, and the metal develops a lived-in patina. It is also a good DIY project with basic tools.
Cut panels have sharp edges, so wear gloves and cover the top with a wooden cap rail. A University of Arizona extension column points to plans for beds built from wood and corrugated sheet metal, which is a good starting design. Keep the width at 4 ft or less.
These taller walls suit root crops and tomatoes. Pair the metal with weathered gray wood and add a few sunflowers or zinnias for color. The bed looks best against a plain wall or fence.
4. Stone, Brick, and Concrete Block Beds
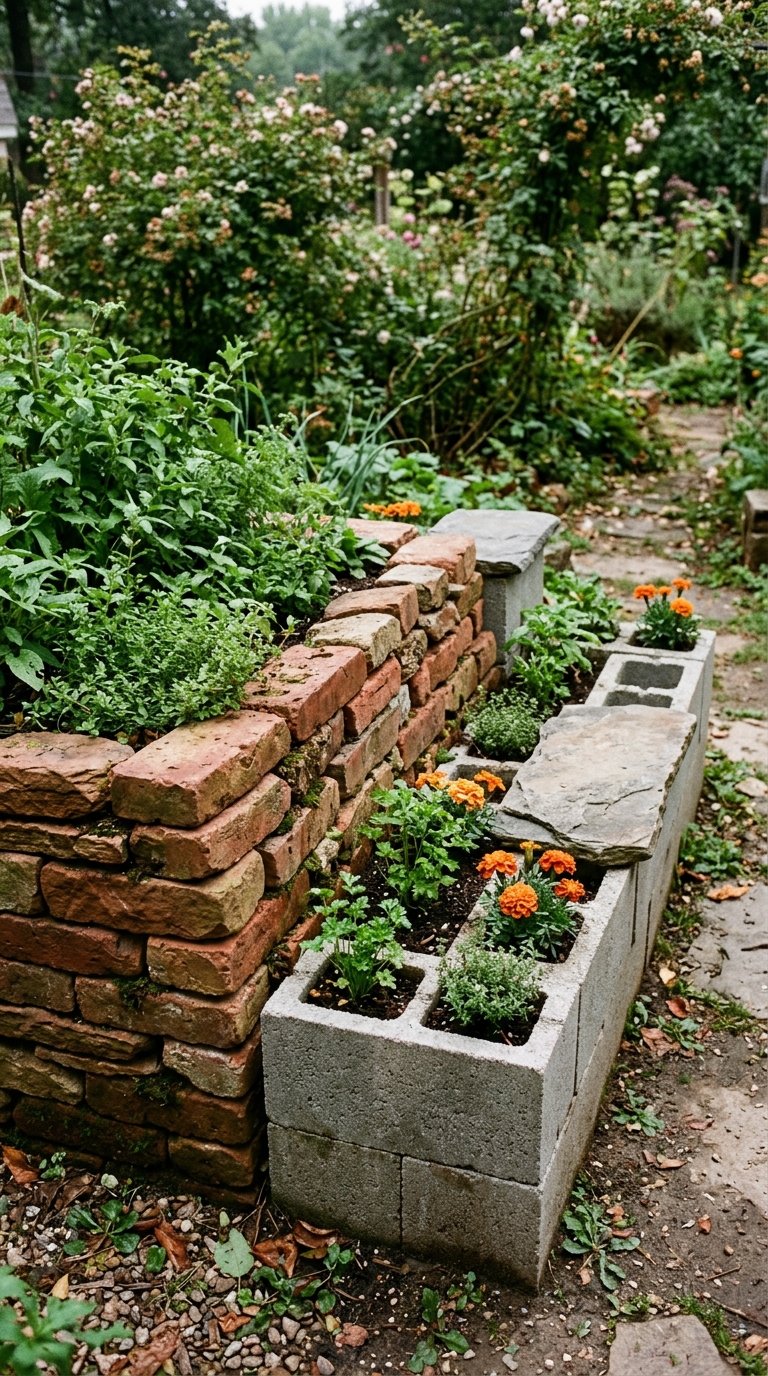
Build snapshot: Best for a permanent look or a low-cost build. Typical size: 3 to 4 ft wide, 8 to 16 in. tall. Cost: budget (block) to premium (stone). Skill: beginner to intermediate.
Masonry beds look permanent and need no mortar when dry-stacked. Concrete blocks are the budget route, while fieldstone and brick cost more but feel more refined. A weekend is often enough for a small bed.
Two courses of standard concrete block rise to roughly 16 in., and the open holes can hold herbs or marigolds. Choose new blocks of known origin rather than salvaged industrial ones. Set the first course level with a spirit level, since everything above follows it.
Masonry holds warmth, which some gardeners appreciate in spring. Top the walls with flat pavers or bluestone to create a ledge for sitting or setting down tools. A stucco or paint finish can hide plain block.
5. Reclaimed Wood and Pallet-Style Budget Beds

Build snapshot: Best for tight budgets. Typical size: 3 to 4 ft wide, 10 to 16 in. tall. Cost: very low. Skill: beginner.
Old fence boards, barn wood, and mismatched planks give a bed character that new lumber cannot copy. It is also one of the cheapest routes to a raised bed. The trade-off is lifespan, because untreated wood in soil contact does not last many years.
Know where the wood came from. Avoid railroad ties and anything treated with creosote. For pallets, look for an HT stamp, which means heat-treated, and skip any marked MB, which means methyl bromide.
Stack two boards high and fasten them to corner stakes. Let the uneven color and grain be part of the look. Plant lettuce, nasturtiums, or bright tomatoes to contrast with the gray wood.
6. Painted and Stained Beds in Garden-Friendly Colors
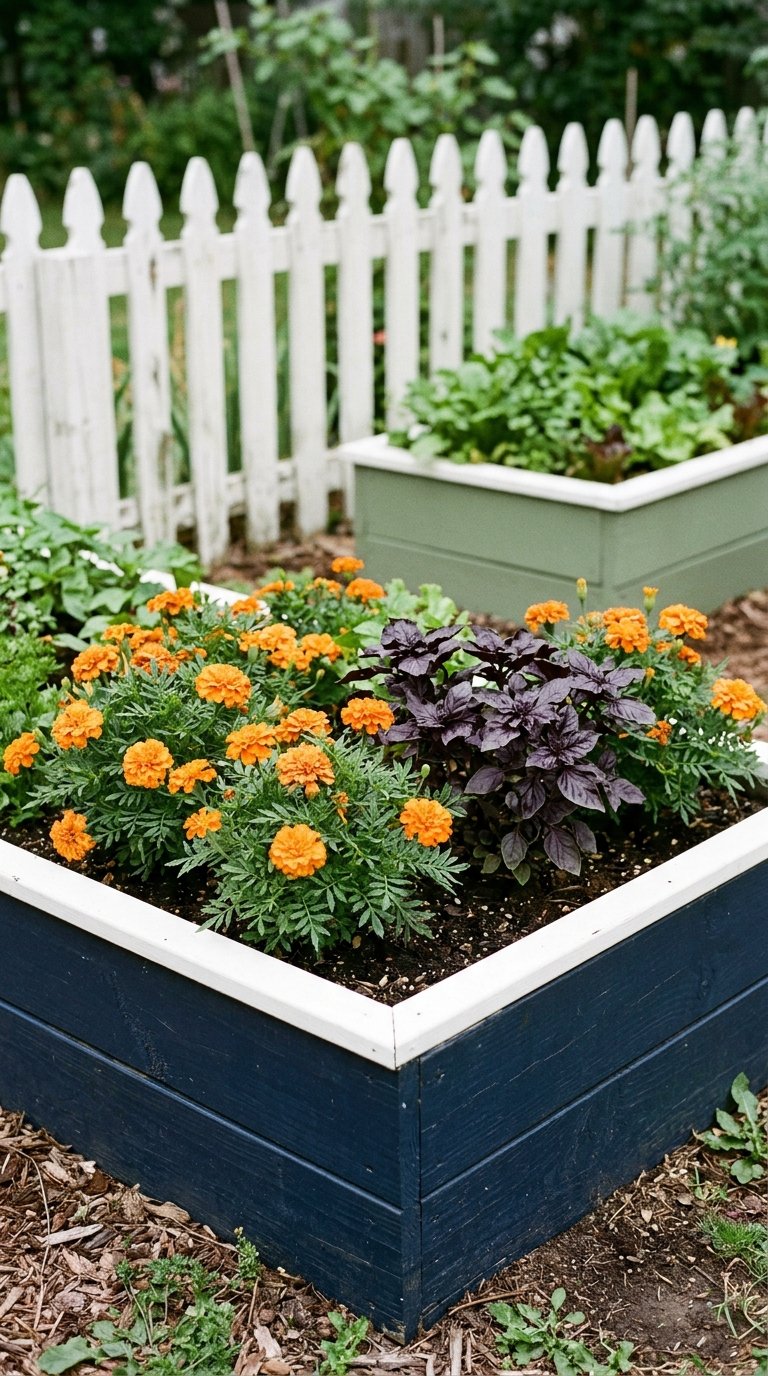
Build snapshot: Best for adding color and style. Typical size: any. Cost: low add-on. Skill: beginner.
Color can make a plain bed feel designed. Try sage green with a cream fence, deep navy against a white picket, or terracotta beside gravel. Stick to one or two colors and repeat them across the yard.
Use exterior paint or stain on the outer faces only, and keep the soil side unpainted. Let the paint cure fully before you fill the bed. Expect to recoat every few years, depending on your weather.
Match the color to something fixed, like a door, a fence, or a planter, so the bed looks planned. Bright flowers, such as orange marigolds, stand out against deep blue. Soft green is the easiest choice for blending into plantings.
Raised Bed Garden Layout Ideas
Shape and layout decide how easy a garden is to reach, water, and walk through. These six layouts solve slopes, corners, and open yards.
7. Tiered Beds for Sloped Yards

Build snapshot: Best for slopes. Typical size: 3 to 4 ft deep per tier. Cost: mid to premium. Skill: intermediate.
A slope can feel like wasted space, but stepped beds turn it into level, plantable ground. Each tier holds soil in place and slows runoff, so you lose less soil in heavy rain. Two or three levels usually look balanced.
Set each tier into the hillside and leave a walkable step or path between levels. Add a layer of gravel behind the walls for drainage. Taller retaining walls may need engineering or a permit, so check local rules before building high.
Think about which tier gets shade. Tall crops on an upper level can shade the rows below. Put sun-hungry tomatoes and peppers where they get 6 to 8 hours of light, and use lower tiers for herbs and greens.
8. Corner and L-Shaped Beds Along Fences and Walls

Build snapshot: Best for fence lines and tight corners. Typical size: arms 2 to 3 ft wide. Cost: low to mid. Skill: beginner.
Corners are easy to waste, and an L-shaped bed puts them to work. The bed wraps two sides of a fence or wall, so it uses space a square bed would leave empty. It also frames the garden and guides foot traffic.
Keep each arm narrow enough to reach. University of California extension suggests that a bed built against a fence or shed should be about 2 to 2.5 ft wide. Trellises on the back wall add height and privacy.
Place tall crops like pole beans or tomatoes along the back, and tuck herbs along the shorter arm. In most US yards, putting tall plants on the north side keeps them from shading shorter ones. Use the inner bend for greens that like some relief from afternoon heat.
9. Keyhole Beds You Can Reach From the Center
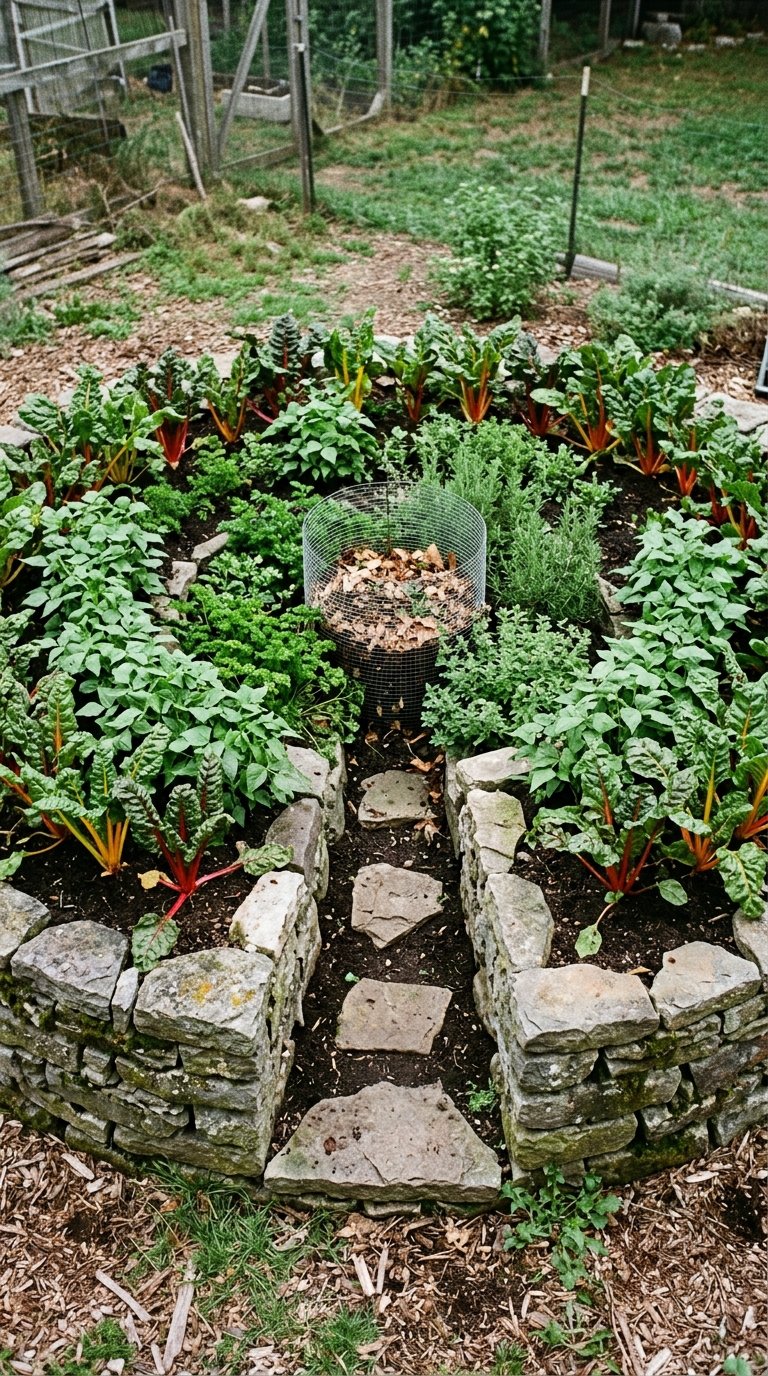
Build snapshot: Best for easy access in a compact footprint. Typical size: circular, with an access notch. Cost: mid. Skill: intermediate.
A keyhole bed is a circle with a notch cut in, so you can walk into the middle and reach the plants around you. It trims path space because one small notch replaces several walkways. It suits gardeners who want everything within arm’s reach.
Many keyhole designs put a compost basket in the center. Kitchen scraps and water feed the surrounding soil. Plan the notch wide enough to stand in comfortably, and keep the planting depth within a comfortable arm’s length.
Stone, block, and wood all work for the walls. Plant a mix of herbs and salad crops you will pick often. Add stepping stones in the notch to keep your shoes out of the mud.
10. Four-Square Potager Layout With Paths
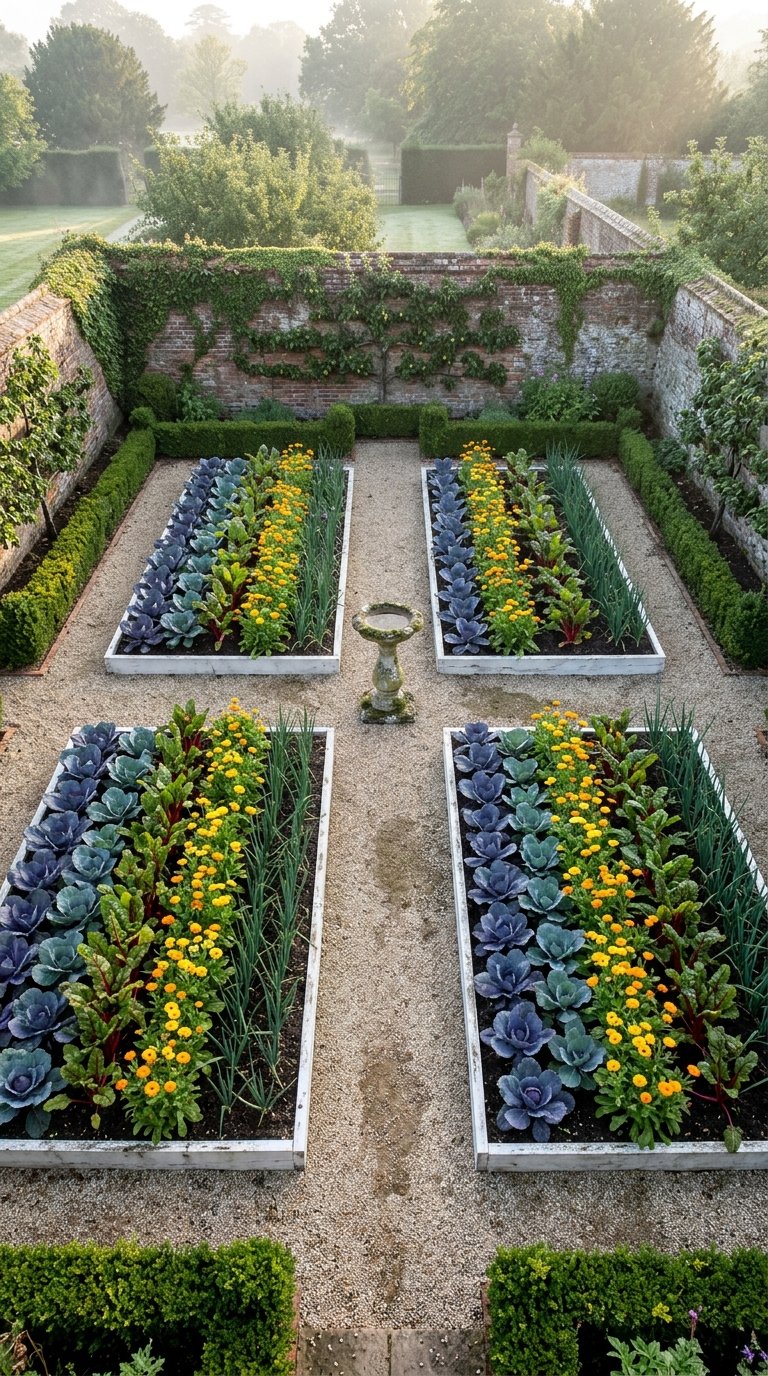
Build snapshot: Best for a formal kitchen garden. Typical size: four beds, each about 4 ft by 4 ft. Cost: mid to premium. Skill: intermediate.
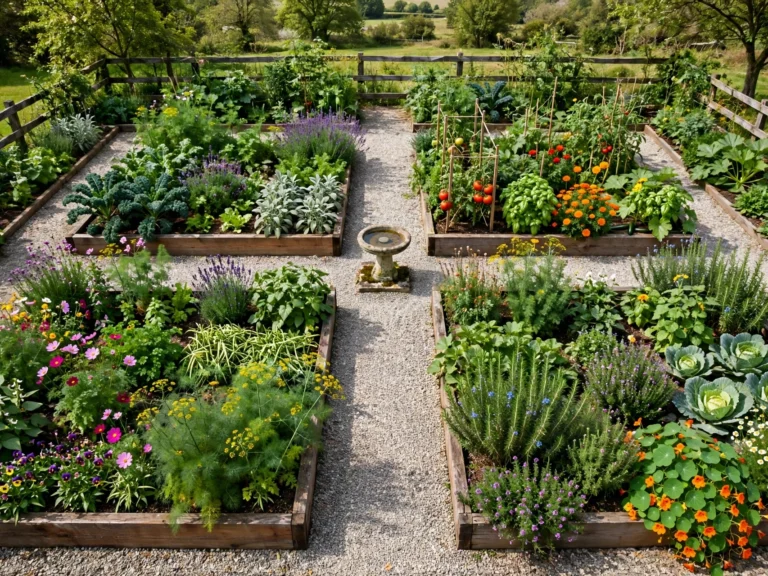
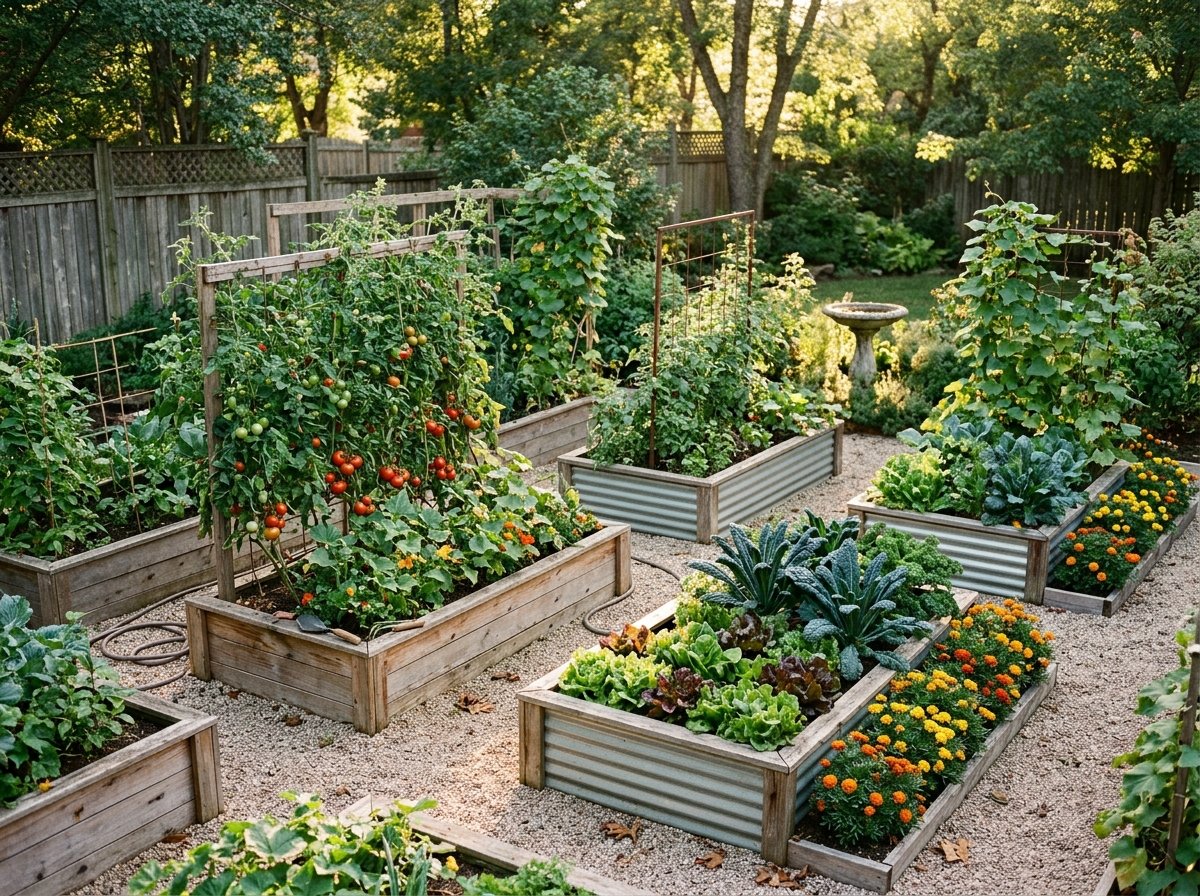
A potager is a decorative kitchen garden, and a four-square layout is its classic form. Four matching beds meet at a central path, with a focal point like a birdbath, a sundial, or a tall pot in the middle. It looks planned even in winter.
Plan paths wide enough for how you work. Missouri Extension suggests paths of about 1 ft for foot traffic only and 2 to 3 ft if you use a wheelbarrow or equipment. Edge the paths with gravel, mulch, or brick so the lines stay crisp.
Four beds also make crop rotation simple, since you can move plant families around each year. Mix in herbs and flowers for color. Popular pairings include basil near tomatoes and marigolds around squash, though results vary.
11. Round and Hexagonal Beds as Garden Focal Points

Build snapshot: Best for open lawns and focal points. Typical size: 4 to 6 ft across. Cost: mid. Skill: beginner to intermediate.
Round and hexagonal beds break up the straight lines of a typical yard. They draw the eye, so they work well as a centerpiece on a lawn or patio. Kits are widely available, and wood, metal, and stone all suit the shape.
Keep the width reachable. If you can only reach from the outside, the radius should be about an arm’s length, so the center is easy to tend. Choose a spot with full sun and decent drainage.
A herb wheel is a lovely use for a round bed, with each wedge holding a different herb. Plant taller thyme, rosemary, or sage near the center and trailing varieties along the edge. A hexagon also works as a flower-and-vegetable mix.
12. Modular Beds You Can Expand Over Time
Build snapshot: Best for beginners and renters. Typical size: modules about 2 to 4 ft wide. Cost: low to start. Skill: beginner.
Modular beds start small and grow when you are ready. Interlocking corners let you add sections without special tools. This lowers the upfront cost and lets you learn your sun and soil first.
Start with two beds and see how much you actually harvest. Next season, add two more and you are halfway to a four-square potager. Many kits can also be taken apart and moved, which suits renters and changing layouts.
Quality varies between kits, so check board thickness, the type of wood or metal, and reviews before buying. Keep the same material across all modules so the garden looks cohesive. Leave room for paths from the start.
Small-Space and Comfort-Friendly Raised Bed Ideas
Not every yard is big, and not every gardener wants to bend. These four ideas bring comfort and height to small spaces.
13. Waist-High Legged Beds for No-Bend Gardening

Build snapshot: Best for back or knee comfort and wheelchair access. Typical size: 2 to 3 ft wide, 24 to 36 in. tall. Cost: mid to premium. Skill: beginner to intermediate.
Legged beds lift the planting surface so you can work standing or seated. Many gardeners find the 24 to 36 in. range comfortable, but match it to your own height or seat. They also keep plants away from some ground-level pests.
The soil layer only needs to be about 8 to 12 in. deep for most vegetables, so you do not need a deep box. Wet soil is heavy, so check the weight rating and use sturdy legs with cross braces. Locking casters let you move the bed toward the sun.
For wheelchair access, leave open space underneath for knees and keep the bed narrow enough to reach across, around 2 ft from the working side. Cedar and metal frames both work well. A lower shelf is handy for tools.
14. Patio, Deck, and Balcony Raised Beds
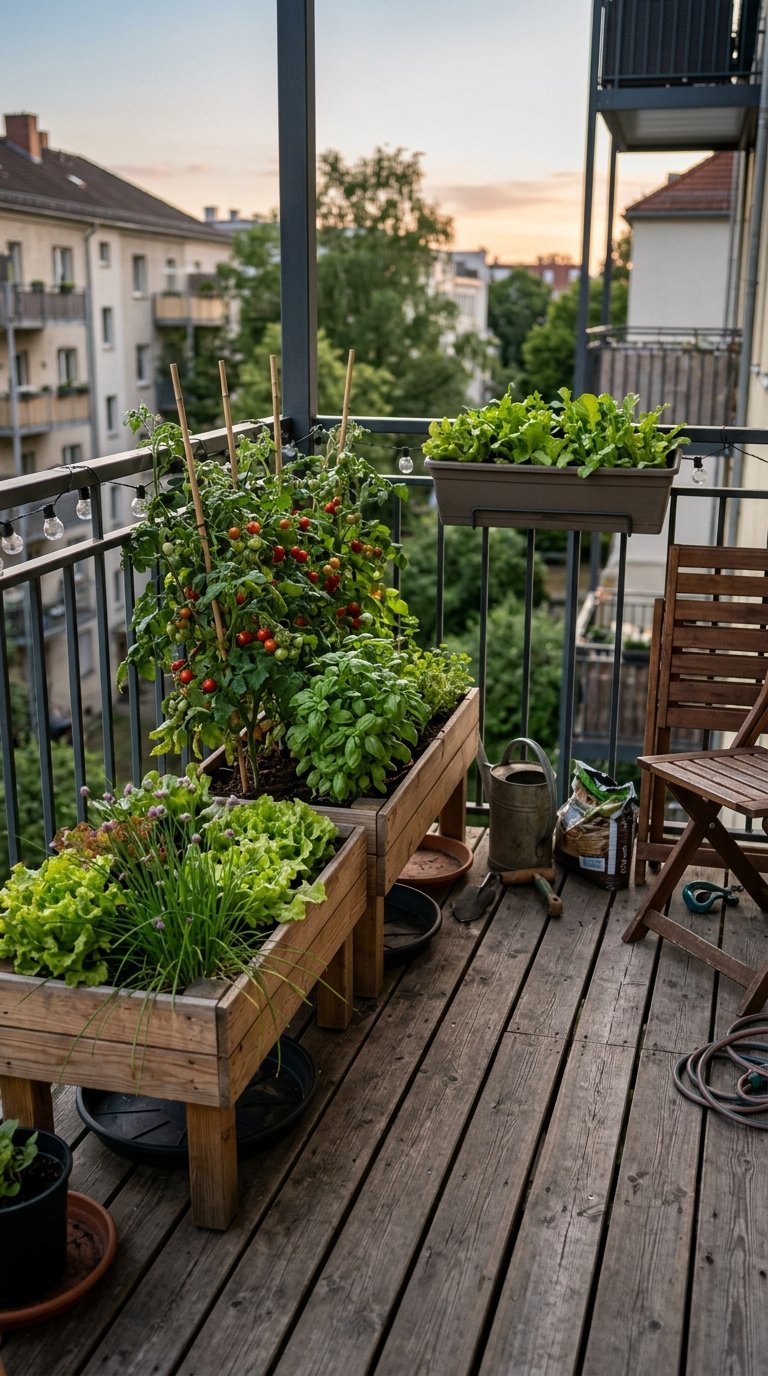
Build snapshot: Best for renters and small outdoor spaces. Typical size: 1.5 to 3 ft wide, 8 to 12 in. deep. Cost: low to mid. Skill: beginner.
A patio or deck bed brings a real vegetable garden to a small space. Shallow beds suit lettuce, herbs, and radishes, while tomatoes and peppers need deeper containers. Choose lightweight potting mix, which is easier on a deck than garden soil.
Watch weight and moisture. Wet soil is heavy, so check the load limits on a balcony or older deck. Use saucers or trays and lift the bed slightly so water drains without staining or rotting the surface beneath.
Fruiting crops like tomatoes need about 6 to 8 hours of full sun, so place beds where the light lands. Group several small beds for a layered look. Rail planters and wall-mounted boxes add extra planting without using floor space.
15. Hugelkultur and Mounded Eco Beds

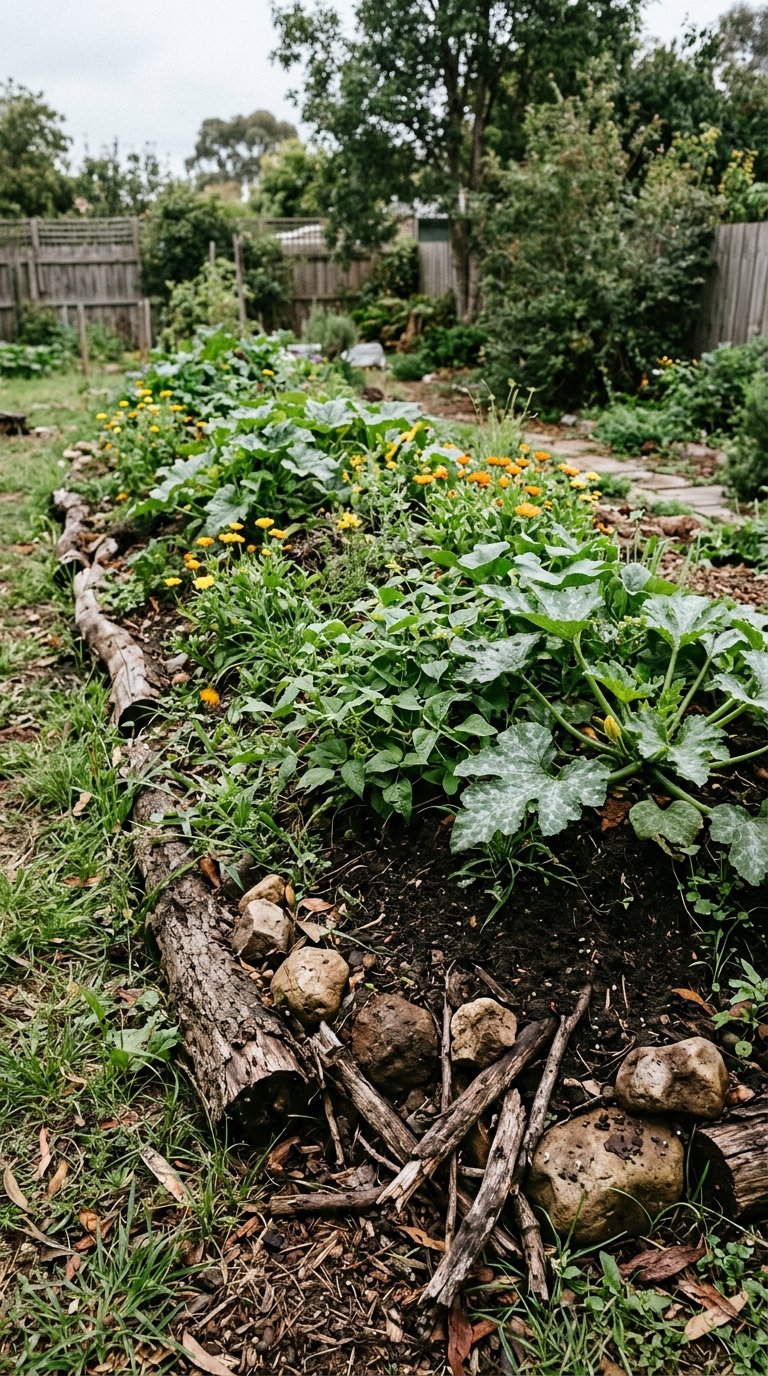
Build snapshot: Best for low-cost fill and eco-minded gardeners. Typical size: mound 3 to 4 ft wide. Cost: very low. Skill: intermediate.
Hugelkultur is a mound built over buried logs and branches, with soil on top. As the wood decays, it holds moisture and releases nutrients. It is a way to use yard waste instead of buying lots of soil.
Use untreated, decaying wood, and avoid treated lumber. Gardeners often suggest keeping black walnut out of the pile, since it can harm some plants. Expect the mound to settle as the wood breaks down, so top it up with compost in later seasons.
The look is soft and natural, and the sloped sides give you extra planting area. Edge the mound with stone or short logs to keep the soil in place. It works best if you have spare logs and are happy with a slow-building bed.
Raised Garden Bed Ideas That Protect and Boost Your Harvest
Some beds are built to defend crops, stretch the season, or save water. These four ideas make your harvest more reliable.
16. Hoop House and Cold Frame Beds for a Longer Season

Build snapshot: Best for cold springs and falls. Typical size: standard bed with hoops. Cost: low to mid. Skill: beginner to intermediate.
Hoops over a bed let you cover crops with row cover or clear plastic. This protects seedlings from cold snaps and can help you start earlier in spring and harvest later in fall. A cold frame, a low box with a clear lid, does a similar job for smaller beds.
Hoops can be made from flexible pipe or galvanized conduit, and the University of California Extension also mentions hoops and shade cloth for extreme temperatures. Secure the cover along the edges so wind cannot lift it. On warm days, open or vent the cover so plants do not overheat.
Timing depends on your climate and USDA zone, so use your last and first frost dates as a guide. In hot regions, swap the plastic for shade cloth in summer. Keep the hoops easy to remove for watering and picking.
How to Choose the Right Raised Garden Bed for Your Yard
Start with your biggest constraint, whether that is budget, slope, space, mobility, or climate. Then pick the idea above that solves it. A few basic numbers make any choice easier.
Width: Aim for 4 ft or less if you can reach from both sides, and about 3 ft if you can only reach from one side. Extension guidance suggests 2 to 2.5 ft for beds against a fence or wall.
Height: Most vegetables do well in about 10 to 12 in. of soil, though sources range from 6 to 24 in. depending on crops. Go taller, around 24 to 36 in., if you want no-bend gardening.
Paths and sun: Leave 1 ft for foot traffic and 2 to 3 ft if you use a wheelbarrow. Fruiting crops like tomatoes and peppers need roughly 6 to 8 hours of full sun.
Soil needed: Multiply length by width by height in feet, then divide by 27 to get cubic yards. A 4 ft by 8 ft bed filled 10 in. deep needs about 1 cubic yard of soil.
Lumber safety: Extension sources differ on treated wood. Many consider modern copper-based treated lumber acceptable, while others advise avoiding it for organic gardening. Everyone agrees to avoid railroad ties and creosote-treated wood.
Finishing Touches That Make Raised Beds Look Polished
Once the beds are built, small details make them feel complete. These three touches add polish without much cost.
Gravel, Mulch, and Stepping-Stone Paths
Paths keep your shoes clean and give the garden clear lines. Gravel drains well, wood chip mulch is soft and cheap, and stepping stones add a classic touch. Lay landscape fabric under gravel to slow weeds, and edge the path so material stays put.
Decorative Caps and Trim
A flat wooden or stone cap along the top rim gives the bed a finished edge. It also makes a handy ledge for sitting or setting down tools. Choose a cap that matches the bed material, and fasten it firmly so it does not shift.
Solar and String Lighting
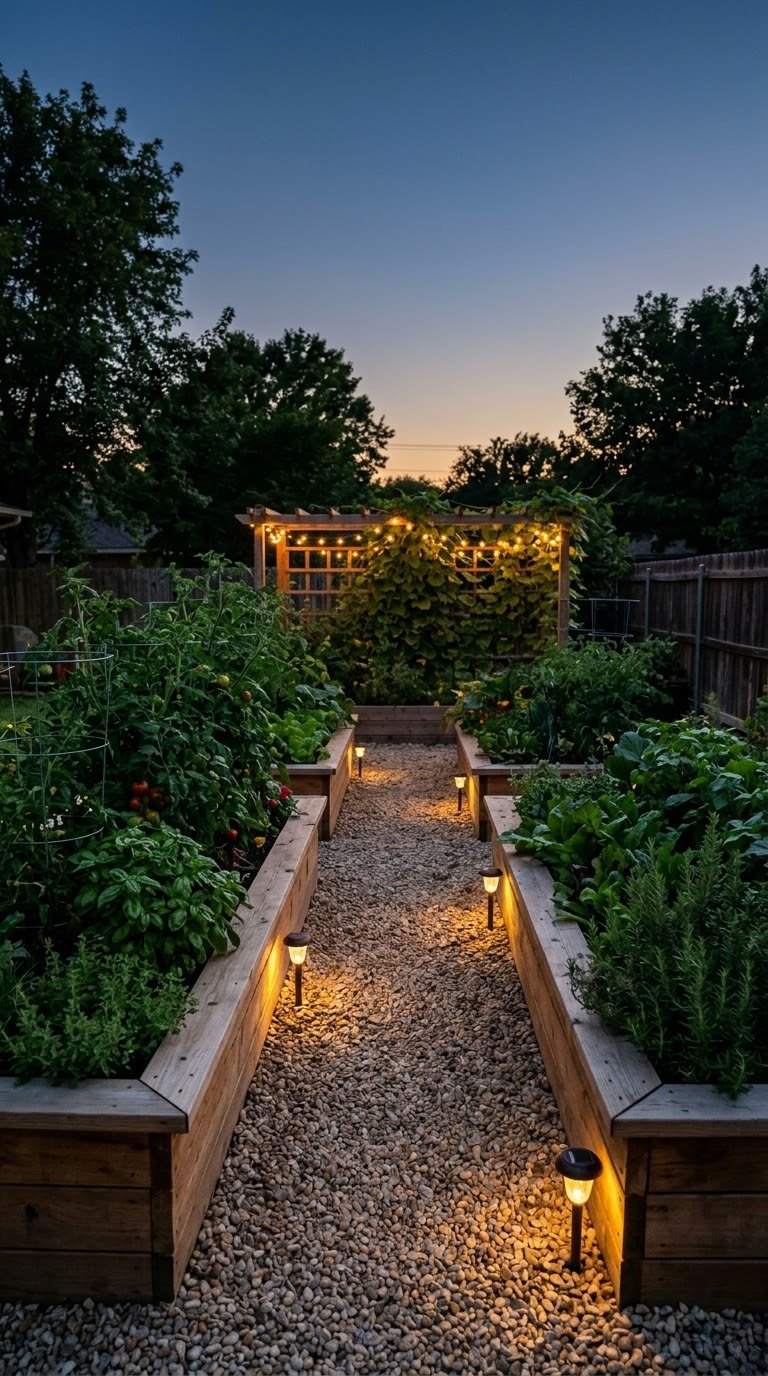
Solar stake lights along paths make an evening garden feel inviting and need no wiring. String lights draped on trellis frames add a warm glow. Keep the lighting soft and low, so it highlights the plants instead of glaring.
Common Raised Bed Mistakes to Avoid
- Making beds too wide. If you cannot reach the middle without stepping in, compacted soil and damaged plants follow. Keep to the width guidance above.
- Choosing a shady spot. Fruiting vegetables need about 6 to 8 hours of sun, so check the light before you build.
- Using unknown lumber. Skip railroad ties, creosote-treated wood, and pallets with an unknown history.
- Leaving paths too narrow. If a wheelbarrow cannot pass, you will end up stepping on beds.
- Skipping the water plan. Place beds near a tap or install drip lines before planting.
- Overbuilding at once. Start with a couple of beds, learn your yard, and expand later.
FAQS
How tall should a raised garden bed be?
Most vegetables grow well in about 10 to 12 in. of soil, though extension sources suggest anywhere from 6 to 24 in. depending on the crop and your needs. Deeper beds suit root vegetables, and 24 to 36 in. beds work well for no-bend gardening. Taller beds need more soil, so they cost more to fill.
How wide should raised beds be, and how far apart?
Keep beds about 4 ft wide or less when you can reach from both sides, or about 3 ft with one-sided access. Beds against a fence or wall are best around 2 to 2.5 ft. Leave paths of about 1 ft for walking and 2 to 3 ft for a wheelbarrow.
What is the cheapest way to build raised garden beds?
Reclaimed boards, concrete blocks, and hugelkultur mounds are the lowest-cost options. Check that any reclaimed wood is untreated or safe, and avoid railroad ties and creosote. Cheap wood may need replacing sooner, so the lowest price is not always the lowest cost over time.
Are galvanized steel and treated lumber safe for vegetables?
Extension guidance varies. Many sources consider modern copper-based treated lumber acceptable, and others advise avoiding it for organic gardening. For galvanized steel, one extension expert noted there is no definitive research on its use for growing vegetables. Check your local extension office if you want guidance for your area.
Do raised beds need a bottom, and how should drainage work?
Most raised beds are open at the bottom so roots and water can reach the ground below. Put cardboard or landscape fabric under the bed to slow weeds. Add hardware cloth if gophers or voles are a problem, and drill drainage holes in any metal tank or patio planter.
What is the best raised bed material for hot or cold climates?
There is no single best material. In hot climates, mulch the soil, water consistently, and consider shade cloth, since metal can get warm. In cold climates, add hoops or a cold frame to extend the season.
How much soil do I need to fill a raised bed?
Multiply length by width by height in feet, then divide by 27 to get cubic yards. A 4 ft by 8 ft bed filled 10 in. deep needs about 1 cubic yard. Bulk soil is often cheaper than bags for large beds, and the soil will settle over time, so plan to top it up.
Final Thoughts
The best raised garden bed is the one that fits your yard, your budget, and the way you like to garden. You do not need to build all of them. Pick one idea that solves your biggest problem, whether that is a slope, a sore back, or a tight patio.
Start small, learn how the sun and water move through your space, and expand when you are ready. Save your favorite ideas to Pinterest, and come back to the chooser section when it is time to build.